By the end of this post, you will have a fully working Terraform environment and two real servers running on AWS.
Step 1: Set Up Your AWS Account
If you don't already have one, head to aws.amazon.com and create a free account. AWS offers a Free Tier that covers most of what you need for learning.
Create an IAM User (Don't Use Root)
The root account has unrestricted access to everything — you never want to use it for day-to-day work. Instead, create an IAM user with programmatic access:
- Log in to the AWS Console
- Navigate to IAM → Users → Add User
- Give it a name (e.g.,
terraform-user) - Select Programmatic access (generates an Access Key ID and Secret Access Key)
- Attach the
AdministratorAccesspolicy (for learning purposes — scope this down in production) - Complete the wizard and download the
.csvfile with your credentials — you will not be able to see the secret key again
Step 2: Install the AWS CLI
The AWS CLI lets you interact with AWS services from your terminal — and Terraform uses it under the hood for authentication.
macOS
brew install awscli
Linux
curl "https://awscli.amazonaws.com/awscli-exe-linux-x86_64.zip" -o "awscliv2.zip"
unzip awscliv2.zip
sudo ./aws/install
Windows
Download and run the MSI installer from the AWS documentation.
Verify the installation
aws --version
# aws-cli/2.x.x Python/3.x.x ...
Configure your credentials
aws configure
You will be prompted for:
- AWS Access Key ID — from the
.csvyou downloaded - AWS Secret Access Key — from the
.csvyou downloaded - Default region — e.g.,
us-east-1 - Default output format —
json
This writes credentials to ~/.aws/credentials and config to ~/.aws/config. Terraform will automatically use these.
Verify access
aws sts get-caller-identity
You should see your account ID and IAM user ARN returned. If you do, your credentials are working.
Step 3: Install Terraform
macOS
brew tap hashicorp/tap
brew install hashicorp/tap/terraform
Linux
sudo apt-get update && sudo apt-get install -y gnupg software-properties-common
wget -O- https://apt.releases.hashicorp.com/gpg | gpg --dearmor | sudo tee /usr/share/keyrings/hashicorp-archive-keyring.gpg
echo "deb [signed-by=/usr/share/keyrings/hashicorp-archive-keyring.gpg] https://apt.releases.hashicorp.com $(lsb_release -cs) main" | sudo tee /etc/apt/sources.list.d/hashicorp.list
sudo apt update && sudo apt-get install terraform
Windows
Download the binary from the Terraform website and add it to your PATH, or use Chocolatey:
choco install terraform
Verify the installation
terraform -version
# Terraform v1.x.x
Step 4: Set Up VSCode with the AWS and Terraform Extensions
Visual Studio Code is the recommended editor for writing Terraform configurations. Install the following extensions:
- HashiCorp Terraform (
hashicorp.terraform) — syntax highlighting, IntelliSense, and format-on-save for.tffiles - AWS Toolkit (
amazonwebservices.aws-toolkit-vscode) — browse AWS resources, view CloudWatch logs, and manage Lambda functions directly from VSCode
Install via the Extensions panel (Make sure to use the ones from the official providers)
- Press
Cmd+Shift+X(macOS) orCtrl+Shift+X(Windows/Linux) - Search for "HashiCorp Terraform" and install the HashiCorp extension
- Search for "AWS Toolkit" and install it
Connect AWS Toolkit to your account
- Click the AWS icon in the left sidebar
- Click Connect to AWS
- Select your profile (the one configured with
aws configure)
You can now browse your S3 buckets, EC2 instances, and other resources directly inside VSCode.
Step 5: Deploy Your First Server (Single EC2 Instance)
Now the fun begins. Create a new folder for your project and a file called main.tf.
Project structure
my-first-server/
└── main.tf
Configure the AWS provider
provider "aws" {
  region = "us-east-1"
}
Deploy a single EC2 instance
resource "aws_instance" "first_server" {
  ami           = "ami-0c55b159cbfafe1f0"  # Amazon Linux 2 in us-east-1
  instance_type = "t2.micro"               # Free Tier eligible

  tags = {
    Name = "FirstServer"
  }
}
The Terraform workflow
# 1. Initialize — downloads the AWS provider plugin
terraform init

# 2. Plan — previews what Terraform will create
terraform plan

# 3. Apply — creates the actual infrastructure
terraform apply
When prompted with Do you want to perform these actions?, type yes.
After a few moments, your EC2 instance is running. You can verify it in the AWS Console under EC2 → Instances.
Make sure that the region you set is active so that you can view your created instance. For my case I set us-east-1 on my provider settings.
Tear it down when done
terraform destroy
Step 6: Deploy a Web Server
Now let's deploy something more useful — an EC2 instance running a simple web server that responds to HTTP requests.
Add a Security Group
By default, AWS blocks all inbound traffic. You need a Security Group to allow HTTP traffic on port 8080.
resource "aws_security_group" "instance" {
  name = "terraform-instance-sg"

  ingress {
    from_port   = 8080
    to_port     = 8080
    protocol    = "tcp"
    cidr_blocks = ["0.0.0.0/0"]
  }
}
Deploy the web server instance
resource "aws_instance" "web_server" {
  ami                    = "ami-0c55b159cbfafe1f0"
  instance_type          = "t2.micro"
  vpc_security_group_ids = [aws_security_group.instance.id]

  user_data = <<-EOF
              #!/bin/bash
              echo "Hello, World" > index.html
              nohup busybox httpd -f -p 8080 &
              EOF

  user_data_replace_on_change = true

  tags = {
    Name = "WebServer"
  }
}
The user_data script runs on first boot and starts a simple HTTP server on port 8080 using BusyBox.
Output the public IP
output "public_ip" {
  value       = aws_instance.web_server.public_ip
  description = "The public IP of the web server"
}
Apply and test
terraform apply
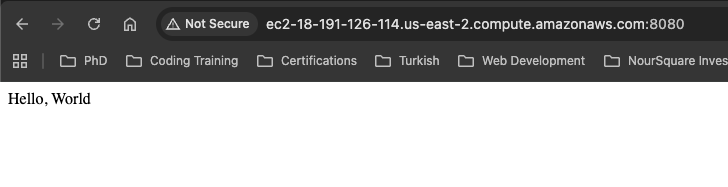
After it completes, Terraform prints the public IP. Test it:
curl http://<public_ip>:8080
# Hello, World
Your web server is live.
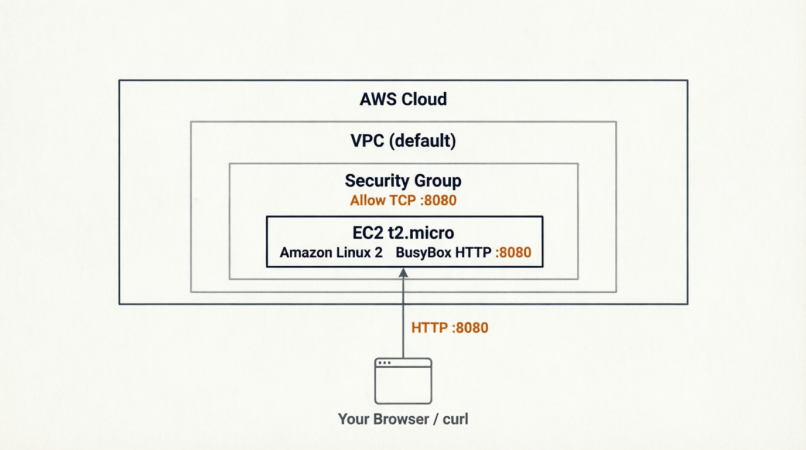
## Infrastructure Diagram
Here is a diagram of what was deployed:
Key Terraform Concepts Introduced
| Concept | What It Does |
|---|---|
provider |
Tells Terraform which cloud platform to use |
resource |
Defines a piece of infrastructure to create |
terraform init |
Downloads providers and sets up the backend |
terraform plan |
Shows a dry-run of changes without applying them |
terraform apply |
Creates or updates real infrastructure |
terraform destroy |
Tears down all managed infrastructure |
user_data |
Bootstrap script that runs on EC2 instance first boot |
output |
Prints values after apply (e.g., IP addresses) |
Conclusion
In just a few steps, we went from zero to a running web server on AWS — all managed through code. Your environment is now set up with:
- An AWS account with a properly scoped IAM user
- The AWS CLI configured with your credentials
- Terraform installed and ready to use
- VSCode with Terraform and AWS extensions
- Two deployed resources: a plain EC2 instance and a working web server
This foundation is everything you need to start building real infrastructure with Terraform. From here, the next steps are scaling up — load balancers, auto-scaling groups, databases, and beyond.
This post is part of a 30-day Terraform learning journey.


💬 Comments
No comments yet. Be the first to share your thoughts!
Leave a Comment