Note: This guide was written for a MkDocs static site (specifically the Material for MkDocs theme). The AWS infrastructure, Terraform configuration, and GitHub Actions workflow are framework-agnostic and will work with any static site generator. The part you will need to adapt is the Dockerfile — replace the
pip installandmkdocs buildcommands with whatever build tool your project uses (e.g.npm install && npm run buildfor a Next.js or Vite project,hugofor Hugo,bundle exec jekyll buildfor Jekyll). The output folder path in the workflow (./site) may also need updating to match your generator's output directory.
What is this document?
This is a step-by-step guide to set up automated deployments for any static site — documentation, a blog, a marketing site, or any project that produces plain HTML/CSS/JS files.
By the end of this guide:
- Every time you push code to the
mainbranch on GitHub, the documentation will build and publish itself to the internet automatically - The site will be served globally over HTTPS through AWS
- The whole process takes about 2 minutes from push to live
- You will never need to manually upload files again
How to read this guide
- Read each section fully before running commands — understanding what a step does makes it easier to fix if something goes wrong
- Lines starting with
#inside code blocks are comments — they explain what the next line does, you don't need to type them - When you see
YOUR_GITHUB_USERNAME, replace it with your actual value - Estimated times are shown so you know when to wait vs when something is stuck
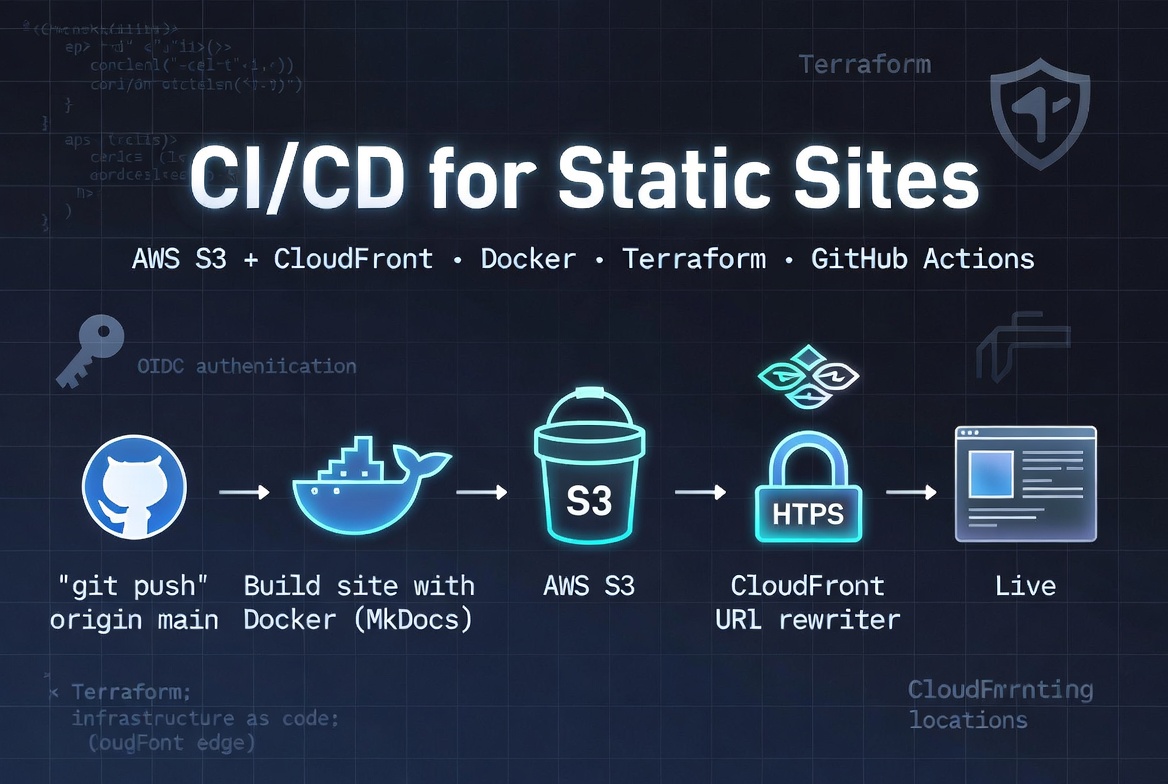
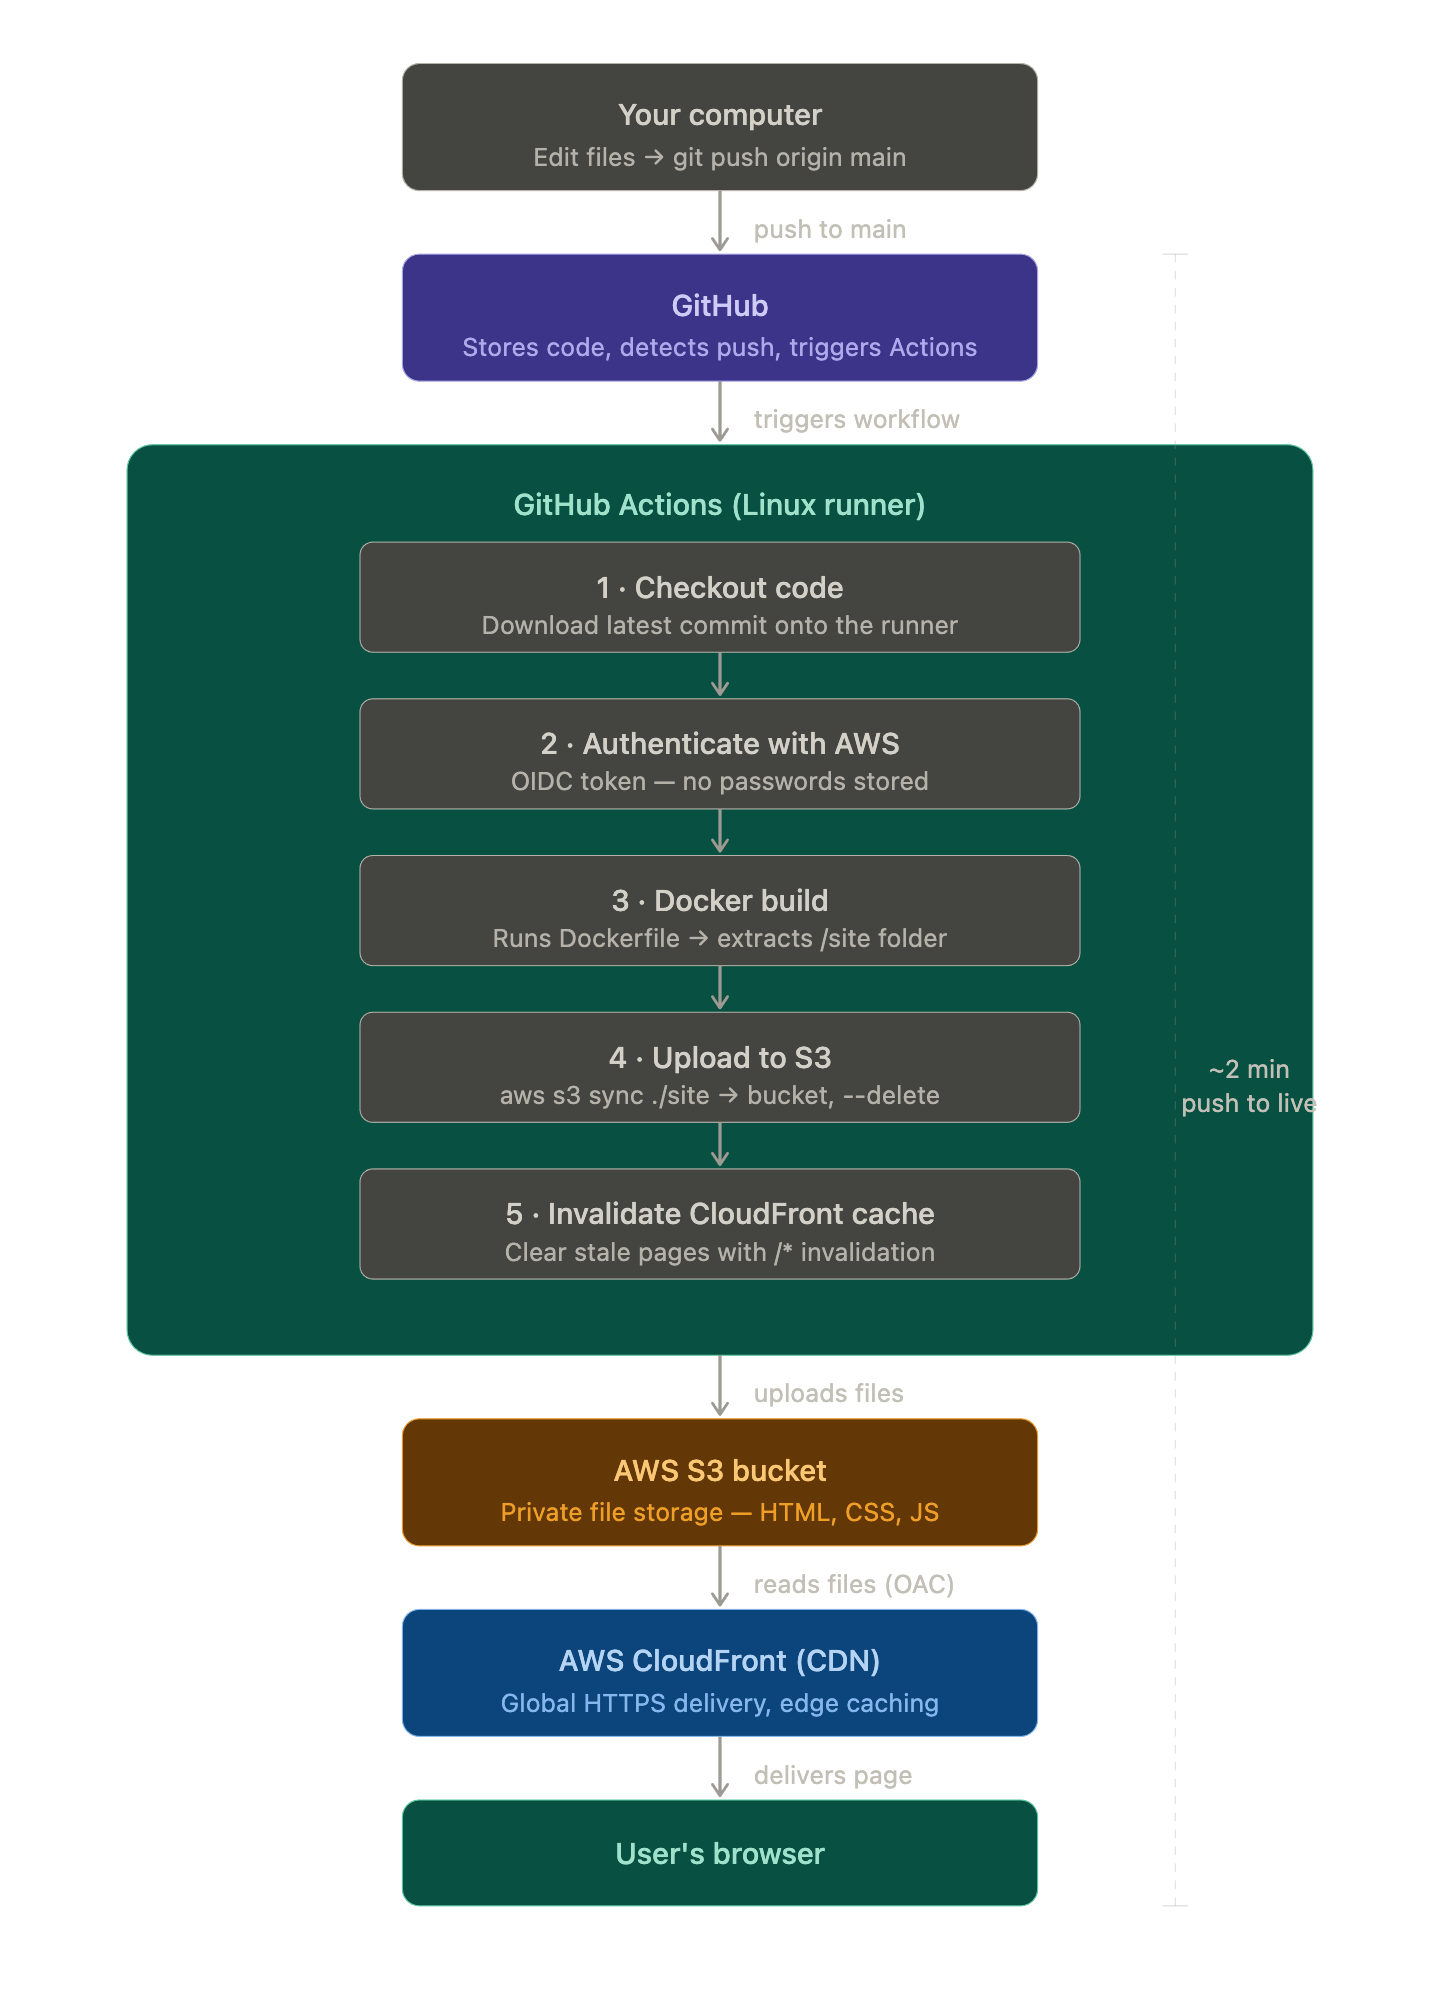
The full picture — how all the pieces connect
Before diving into steps, here is the complete picture of what we are building and how each tool connects to the next:
Before you begin — tools you need installed
You need these four tools installed on your computer before starting. Follow the links to install any that are missing.
1. Git
Used to push code to GitHub.
git --version
# You should see: git version 2.x.x
If not installed: https://git-scm.com/downloads
2. Docker Desktop
Used to build the MkDocs site in a container.
docker --version
# You should see: Docker version 24.x.x
If not installed: https://www.docker.com/products/docker-desktop/
After installing Docker Desktop, make sure it is running (the whale icon in your menu bar) before proceeding.
3. Terraform
Used to create the AWS infrastructure.
terraform --version
# You should see: Terraform v1.x.x
If not installed: https://developer.hashicorp.com/terraform/install
On macOS the easiest way is:
brew install terraform
4. AWS CLI
Used by the GitHub Actions pipeline to upload files to S3.
aws --version
# You should see: aws-cli/2.x.x
If not installed: https://docs.aws.amazon.com/cli/latest/userguide/install-cliv2.html
AWS credentials on your machine
Terraform needs to connect to your AWS account to create resources. You mentioned Terraform is already connected — if you can run:
aws sts get-caller-identity
And it returns your account ID without an error, you are good to go.
Files being created
Here is everything we will create in this guide, so you know what to expect:
product-roadmap/
├── .gitignore                           ← Excludes build output, Terraform state, provider binaries
├── Dockerfile                           ← Tells Docker how to build the site
├── .github/
│   └── workflows/
│       └── deploy.yml                   ← The automated pipeline definition
└── deployment/
    ├── pipeline.md                      ← This document
    └── terraform/
        ├── variables.tf                 ← Your settings (region, bucket name, GitHub repo)
        ├── main.tf                      ← Creates the S3 bucket, CloudFront + rewrite function
        ├── iam.tf                       ← Creates the deploy role GitHub Actions uses
        └── outputs.tf                   ← Prints the 4 values you need for GitHub Secrets
Important: The
.terraform/directory (containing the AWS provider binary — ~650 MB) andterraform.tfstatefiles must never be committed to git. This is already handled by the.gitignoreentries added during setup.
All of these files already exist in the repository. This guide walks through what each one does, then shows you how to run them.
Step 1 — Understand the Dockerfile
File: Dockerfile at the root of the project.
What it does: Defines a recipe for Docker to follow when building the site. When the pipeline runs, Docker follows these instructions to produce the /site folder — the compiled documentation as plain HTML/CSS/JS files.
Why Docker at all?
Imagine two scenarios:
Without Docker: The pipeline installs Python, installs pip packages, runs mkdocs build. If GitHub updates its runner and the Python version changes, or a package behaves differently, your build breaks in ways that are hard to debug because it only breaks on GitHub, not on your laptop.
With Docker: We define the exact Python version and packages inside the Dockerfile. The pipeline just runs Docker. The result is always identical — on your laptop, on GitHub, on any machine.
What the Dockerfile does, line by line
# Stage 1: Build the site
FROM python:3.12-slim AS builder    # Start from Python 3.12. "slim" = smaller image size.

WORKDIR /app                        # All commands below run from this folder inside the container.

COPY requirements.txt .             # Copy requirements first (reason explained below)
RUN pip install -r requirements.txt # Install MkDocs, Material theme, encryptcontent plugin

COPY . .                            # Copy the rest of the project
RUN mkdocs build                    # Build the site. Output goes to /app/site.

# Stage 2: Local preview (not used in production)
FROM nginx:alpine AS server         # A tiny web server image
COPY --from=builder /app/site /usr/share/nginx/html  # Copy the built site into it
EXPOSE 80
Why copy
requirements.txtbefore everything else? Docker builds each instruction as a cached layer. By copyingrequirements.txtfirst, Docker can reuse the cached pip install layer on future builds — as long as your requirements haven't changed, it skips reinstalling packages entirely. This makes rebuilds much faster.
Why not use
--strict? Themkdocs-encryptcontent-pluginalways emits a brute-force warning, which--strictwould treat as a fatal error — killing every build even when nothing is actually wrong. We run plainmkdocs buildinstead. Warnings are still visible in the build log so you can review them.
Test locally (optional but recommended)
Before we deploy anything, you can test the Docker build works on your machine:
# From the root of the project
docker build -t roadmap-preview .
Then preview it:
docker run -p 8080:80 roadmap-preview
# Open http://localhost:8080 in your browser
Press Ctrl+C to stop it when done.
Step 2 — Create the AWS infrastructure with Terraform
Files: deployment/terraform/
What it does: Creates three things in your AWS account:
- A private S3 bucket to store the site files
- A CloudFront distribution to serve the site over HTTPS
- An IAM role so GitHub Actions can deploy without storing passwords
You run this once. After that, the infrastructure is permanent until you destroy it.
Why not just click through the AWS console?
You could create an S3 bucket by clicking around the AWS web interface. The problem: next week you won't remember exactly what you clicked. If you need to recreate it, or a colleague needs to do the same setup, there is no record.
Terraform solves this by describing infrastructure as code. The .tf files are the source of truth. Anyone can read them and know exactly what was created.
2a. variables.tf — your settings
This file contains the values that are specific to your setup. Open it and check these before running anything:
variable "aws_region" {
  default = "eu-west-3"        # Change to your preferred AWS region
}

variable "s3_bucket_name" {
  default = "your-site-bucket"  # Globally unique across all AWS accounts worldwide
}

variable "github_org" {
  default = "YOUR_GITHUB_ORG"   # GitHub username or organisation
}

variable "github_repo" {
  default = "YOUR_REPO_NAME"    # GitHub repository name
}

variable "domain_name" {
  default = "docs.your-domain.com"  # Custom domain (requires DNS setup — see Step 6)
}
All variables have defaults — you do not need to pass any -var flags when running Terraform.
Why does the bucket name need to be globally unique? AWS S3 bucket names exist in a single global namespace shared across every AWS account. If a name was recently deleted and recreated, AWS may put it in a brief reservation limbo that causes creation to hang for many minutes. If this happens, simply rename it by changing
s3_bucket_nameinvariables.tf.
2b. main.tf — S3 bucket and CloudFront
This file creates the two main AWS resources:
The S3 bucket stores your site's files. Key properties:
block_public_acls = trueand related settings — no one can access S3 directly from the internet. Every request goes through CloudFront.versioning enabled— AWS keeps a full history of all uploaded files. This is what enables rollback.
The CloudFront distribution is what users actually connect to when they visit your site:
- It sits in front of S3 and adds HTTPS (secure connection)
- It caches your pages at edge servers around the world (Dublin, New York, Singapore, etc.)
PriceClass_100means it only uses edge servers in North America and Europe (cheapest tier)redirect-to-httpsmeans anyone who trieshttp://gets redirected tohttps://automatically
Origin Access Control (OAC) is the link between CloudFront and S3. It's like a VIP pass — CloudFront has it, so S3 will serve files to CloudFront. Without the pass, S3 refuses. This is how the bucket stays private while still being served publicly through CloudFront.
CloudFront Function (URL rewriter) — CloudFront's default_root_object only works for the homepage (/). Without extra configuration, visiting a subpage like /reference/glossary/ returns a 403 error because S3 doesn't know to look for index.html inside that folder.
We add a small CloudFront Function that rewrites every request automatically:
/reference/glossary/→/reference/glossary/index.html/roadmap/phase-1→/roadmap/phase-1/index.html
This runs at the edge before CloudFront even touches S3, so there is zero performance impact.
2c. iam.tf — the deploy role
This file creates the AWS identity that GitHub Actions uses when it deploys.
The traditional approach (avoid this): Create an AWS user, generate an access key and secret, paste them into GitHub Secrets. Problem: those credentials never expire. If they leak, someone has permanent access to your AWS account.
What we do instead — OIDC: GitHub Actions gets a short-lived token (like a one-day visitor pass) that proves it is your specific repository pushing to main. AWS verifies this token and issues temporary credentials that expire when the pipeline run ends. Nothing permanent is ever stored.
The role has a policy that says: "you may only put files into this S3 bucket and clear this CloudFront cache". It cannot create new AWS resources, cannot access other buckets, cannot touch billing. This is the security principle of least privilege.
2d. outputs.tf — what gets printed after apply
After Terraform creates everything, it prints four values you need. This file defines what those values are:
s3_bucket_name— the bucket to paste into GitHub Secretscloudfront_distribution_id— the CDN ID to paste into GitHub Secretscloudfront_url— the public URL of your live sitegithub_deploy_role_arn— the IAM role ARN to paste into GitHub Secrets
Running Terraform
Now that you understand what each file does, run it:
# Move into the terraform folder
cd deployment/terraform
AWS profile: Terraform uses the
profile = "YOUR_PROFILE"set inmain.tf. If you haveAWS_ACCESS_KEY_IDset as an environment variable from a different project, it will override the profile. Always clear those first:unset AWS_ACCESS_KEY_ID AWS_SECRET_ACCESS_KEY AWS_SESSION_TOKEN
Step 2.1 — Initialize (first time only, ~30 seconds)
AWS_PROFILE=YOUR_PROFILE terraform init
What you'll see:
Initializing the backend...
Initializing provider plugins...
- Finding hashicorp/aws versions matching "~> 5.0"...
- Installing hashicorp/aws v5.100.0...

Terraform has been successfully initialized!
Do not commit the
.terraform/folder. The AWS provider binary inside it is ~650 MB and will be rejected by GitHub. It is listed in.gitignoreand is safe to ignore —terraform initre-downloads it on any new machine.
Step 2.2 — Preview (no changes made, ~10 seconds)
AWS_PROFILE=YOUR_PROFILE terraform plan
This shows you exactly what Terraform would create. You'll see a list of resources with + symbols. No changes are made yet. No -var flags needed — all values are set as defaults in variables.tf.
Step 2.3 — Apply (creates everything, ~5–10 minutes)
AWS_PROFILE=YOUR_PROFILE terraform apply -auto-approve
Expect a wait on CloudFront — it deploys globally across all edge locations which takes 3–5 minutes. This is normal. S3, IAM, and the CloudFront Function all create in seconds.
After it finishes, you'll see the outputs:
Apply complete! Resources: 8 added, 0 changed, 0 destroyed.

Outputs:

acm_dns_validation = {
  "docs.your-domain.com" = {
    name  = "_abc123.docs.your-domain.com."
    type  = "CNAME"
    value = "_xyz789.acm-validations.aws."
  }
}
cloudfront_cname               = "docs.your-domain.com → YOUR_CF_SUBDOMAIN.cloudfront.net"
cloudfront_distribution_id    = "YOUR_CF_DISTRIBUTION_ID"
cloudfront_url                 = "https://YOUR_CF_SUBDOMAIN.cloudfront.net"
github_deploy_role_arn         = "arn:aws:iam::YOUR_AWS_ACCOUNT_ID:role/your-project-github-deploy"
s3_bucket_name                 = "your-site-bucket"
Copy all outputs and paste them somewhere safe — you need them in Steps 3 and 6.
Step 3 — Add secrets to GitHub
What are GitHub Secrets? They are encrypted variables stored inside your repository settings. The pipeline can read them during a run, but they are never visible in any log output, and no one browsing your repository can see them. This is where we store the AWS values from the previous step.
How to add them
- Go to your repository on github.com
- Click Settings (the gear tab near the top)
- In the left sidebar, click Secrets and variables → Actions
- Click the green New repository secret button
Add each of these four secrets, one at a time:
| Secret name (type exactly as shown) | Value |
|---|---|
AWS_DEPLOY_ROLE_ARN |
arn:aws:iam::YOUR_AWS_ACCOUNT_ID:role/your-project-github-deploy |
AWS_REGION |
eu-west-3 |
S3_BUCKET_NAME |
your-site-bucket |
CLOUDFRONT_DISTRIBUTION_ID |
YOUR_CF_DISTRIBUTION_ID |
Secret names are case-sensitive.
AWS_REGIONis not the same asaws_region. Type them exactly as shown.
After adding all four, the Secrets page should show four entries. The values are hidden but the names are visible.
Step 4 — Understand the GitHub Actions workflow
File: .github/workflows/deploy.yml
What it does: This YAML file is the brain of the pipeline. GitHub reads it automatically. It says: "when someone pushes to main, run these 5 steps in order."
Reading the workflow file
on:
  push:
    branches:
      - main        # Only run when code is pushed to the main branch
  workflow_dispatch: # Also allow manual runs from the GitHub Actions tab
permissions:
  id-token: write  # Required to request the OIDC token from GitHub
  contents: read   # Required to read the repository code
The permissions block is part of the OIDC security. GitHub will not issue an authentication token to AWS unless the workflow explicitly requests it with id-token: write.
steps:
  - name: Checkout repository      # Step 1: download the code
  - name: Configure AWS credentials # Step 2: authenticate with AWS via OIDC
  - name: Build site with Docker    # Step 3: run the Dockerfile, extract /site
  - name: Upload to S3              # Step 4: sync files to the bucket
  - name: Invalidate CloudFront cache # Step 5: clear the CDN cache
What each step does in detail
Step 1 — Checkout: Downloads your latest commit onto the GitHub Actions runner (the temporary Linux server). Without this, the runner has no code to work with.
Step 2 — AWS credentials: Uses the OIDC role you created in Terraform. GitHub generates a short-lived identity token, sends it to AWS, and gets back temporary credentials. These credentials are valid only for this pipeline run and are never stored anywhere.
Step 3 — Docker build: Runs docker build --target builder, which follows the Dockerfile to build the MkDocs site. Then extracts the /site folder from the container using docker cp. The container is deleted immediately after — it was just used to run the build.
Step 4 — S3 sync: Runs aws s3 sync ./site s3://YOUR_BUCKET --delete. The sync command is smarter than a plain upload — it only transfers files that changed and deletes files from S3 that were removed from your site. The --cache-control header tells browsers to cache pages for 1 hour.
Step 5 — CloudFront invalidation: Sends /* to CloudFront, meaning "clear the cache for all pages". CloudFront will fetch fresh copies from S3 the next time each page is requested. Within about 30 seconds, every edge server in the world has cleared its old cache.
Step 5 — Trigger the first deploy
Everything is in place. Time to see it work.
# From the root of the project
git add .
git commit -m "Add CI/CD pipeline: Dockerfile, Terraform, GitHub Actions"
git push origin main
Watch it run
- Go to your repository on github.com
- Click the Actions tab
- You'll see a workflow run called "Deploy Roadmap to AWS" with a yellow spinning circle (in progress)
- Click on it to open the run
- Click on "Build & Deploy" to see the individual steps
- Each step will show a green checkmark when it succeeds
The steps will complete in roughly this order and timing:
✓ Checkout repository          (~5 seconds)
✓ Configure AWS credentials    (~5 seconds)
✓ Build site with Docker       (~60–90 seconds)
✓ Upload to S3                 (~15 seconds)
✓ Invalidate CloudFront cache  (~5 seconds)
When all steps are green, your documentation is live. Open the cloudfront_url from your Terraform output in a browser.
If a step shows a red X: Click on it to expand the log. The error message will tell you what went wrong. Common issues are listed at the bottom of this document.
Day-to-day usage — how to update the documentation
This is what using the pipeline looks like once it's set up:
# 1. Make your edits to any .md file
#    (the pipeline handles the rest)

# 2. Stage your changes
git add .

# 3. Commit with a descriptive message
git commit -m "Update phase 1 milestones"

# 4. Push — this triggers the pipeline
git push origin main

# 5. Wait ~2 minutes, then refresh the live URL
You can also trigger a deploy without making any code changes from the GitHub Actions tab: click Run workflow next to your workflow name.
Rollback — if you need to undo a deploy
Option 1 — Revert the commit (recommended)
This is the cleanest approach. It creates a new commit that undoes your last change, then deploys that.
git revert HEAD --no-edit   # Creates a "revert" commit automatically
git push origin main        # Triggers a new pipeline run with the reverted content
Option 2 — Restore from S3 version history
Because we enabled versioning on the S3 bucket, AWS keeps a copy of every file that was ever uploaded. You can restore a specific file to a previous version:
# List all saved versions of a specific file
AWS_PROFILE=YOUR_PROFILE aws s3api list-object-versions \
  --bucket your-site-bucket \
  --prefix index.html

# Copy a specific old version back to become the current version
AWS_PROFILE=YOUR_PROFILE aws s3api copy-object \
  --bucket your-site-bucket \
  --copy-source "your-site-bucket/index.html?versionId=PASTE_VERSION_ID_HERE" \
  --key index.html
Common errors and how to fix them
"The bucket name is already taken"
S3 bucket names are global. Open variables.tf and change s3_bucket_name to something unique (e.g. add your username or a year suffix), then re-run terraform apply.
"Error: configuring Terraform AWS Provider: no valid credential sources"
Terraform can't connect to your AWS account. Make sure you are running with AWS_PROFILE=YOUR_PROFILE. Run AWS_PROFILE=YOUR_PROFILE aws sts get-caller-identity — if it returns your account ID without an error, credentials are working correctly.
Terraform creates resources in the wrong AWS account
If you have AWS_ACCESS_KEY_ID set as an environment variable (from another project or terminal session), it overrides the profile in main.tf. Always run unset AWS_ACCESS_KEY_ID AWS_SECRET_ACCESS_KEY AWS_SESSION_TOKEN before terraform apply.
S3 bucket creation hangs for many minutes
AWS puts recently-deleted bucket names in a reservation limbo. If you deleted a bucket recently and recreate it immediately, creation may stall. Cancel with Ctrl+C, change s3_bucket_name in variables.tf to a new name, and re-run terraform apply.
Pipeline fails on "Configure AWS credentials"
The OIDC role ARN in your GitHub Secret doesn't match what Terraform created. Double-check that AWS_DEPLOY_ROLE_ARN contains the exact value from terraform output github_deploy_role_arn.
Pipeline fails on "Build site with Docker"
The Dockerfile couldn't build the MkDocs site. Look at the Docker build log for the line that says ERROR. Fix the issue in the relevant .md file, then push again.
"AccessDenied" when uploading to S3
The deploy role doesn't have permission to the bucket. This shouldn't happen if Terraform created both, but if you renamed the bucket manually, re-run terraform apply to sync the policy.
Changes deployed but site still shows old content
CloudFront cached the old version. Wait up to 60 seconds — the invalidation in Step 5 of the pipeline clears it, but propagation takes a moment. If it persists after a full minute, check that the CLOUDFRONT_DISTRIBUTION_ID secret matches your distribution.
Step 6 — Configure a custom domain
The site is currently live at https://YOUR_CF_SUBDOMAIN.cloudfront.net. This step switches it to your custom domain (e.g. docs.your-domain.com).
Cost: Free. ACM certificates used with CloudFront are completely free and auto-renew every year.
The infrastructure for this is already set up in main.tf and variables.tf. What's left is two DNS records at your domain provider.
Why two DNS records?
AWS needs to verify that you actually own your domain before issuing the certificate. You prove ownership by adding a specific CNAME record to your DNS. Once AWS sees it, the certificate is validated. Then you add a second CNAME to point the subdomain at CloudFront.
Important: ACM certificates for CloudFront must be created in
us-east-1(N. Virginia), even though all other infrastructure is ineu-west-3(Paris). This is a hard AWS requirement. Themain.tfhandles this automatically with a secondproviderblock aliased tous-east-1.
Step 6.1 — Run terraform apply
The domain is already set in variables.tf. Just apply:
cd deployment/terraform
unset AWS_ACCESS_KEY_ID AWS_SECRET_ACCESS_KEY AWS_SESSION_TOKEN
AWS_PROFILE=YOUR_PROFILE terraform apply -auto-approve
This creates the ACM certificate and updates the CloudFront distribution with your domain alias.
Step 6.2 — Add the certificate validation CNAME
After terraform apply finishes, the output includes acm_dns_validation. It looks like this:
acm_dns_validation = {
  "docs.your-domain.com" = {
    name  = "_abc123.docs.your-domain.com."
    type  = "CNAME"
    value = "_xyz789.acm-validations.aws."
  }
}
Go to your domain provider's DNS settings and add:
| Type | Name (Host) | Value (Points to) | TTL |
|---|---|---|---|
CNAME |
_abc123def456.roadmap |
_xyz789ghi012.acm-validations.aws. |
300 |
Use the exact values from your terminal output — the strings above are examples only.
AWS checks for this record periodically. Certificate validation usually takes 5–15 minutes. You can watch the status in AWS Console → Certificate Manager.
Step 6.3 — Add the site CNAME
Once the certificate shows Issued status, add the second DNS record:
| Type | Name (Host) | Value (Points to) | TTL |
|---|---|---|---|
CNAME |
roadmap |
YOUR_CF_SUBDOMAIN.cloudfront.net. |
300 |
DNS propagation takes a few minutes. After that, your custom domain will serve the live site with a valid HTTPS certificate.
There is no IP address to add. CloudFront is a distributed network with hundreds of servers worldwide — it has no single IP. That's why you use a
CNAME(which points to a hostname) rather than anArecord (which points to an IP).
Security design decisions
This section explains why we made specific security choices:
| Decision | Why |
|---|---|
| S3 bucket is fully private | If S3 were public, anyone who guessed a file URL would bypass CloudFront entirely (no HTTPS, no caching, direct billing on your S3). Private bucket + CloudFront OAC is the correct pattern. |
| OIDC instead of access keys | Access keys are like passwords that never expire. OIDC tokens are like one-day visitor passes — they expire automatically and are tied to a specific repo and branch. |
| Least-privilege IAM role | The deploy role can do exactly two things. Not "all of S3", not "all of CloudFront" — specifically this bucket and this distribution. If the credentials were somehow compromised, the blast radius is minimal. |
mkdocs build (no --strict) |
The encryptcontent plugin emits a brute-force warning on every build. --strict would abort on this warning even though it's expected, so we run without it. Warnings still appear in the build log. |
encryptcontent plugin compatibility |
The MkDocs password protection encrypts page HTML at build time before it reaches S3. The pipeline does not need to handle passwords — encryption happens in the Docker build step and the ciphertext is what gets uploaded. |
Cost breakdown
After setup, ongoing costs are minimal:
| AWS service | What we use it for | Estimated monthly cost |
|---|---|---|
| S3 | File storage (~50 MB) | < $0.01 |
| S3 requests | CloudFront fetching files | < $0.01 |
| CloudFront | Global HTTPS delivery (~5 GB/month) | ~$0.50 |
| ACM certificate | HTTPS (only needed for custom domain) | Free |
| Total | < $1 / month |
The cloudfront-js-2.0 CloudFront Function (used for subdirectory URL rewriting) is also free up to 2 million invocations per month.
GitHub Actions is free for public repositories. For private repositories, GitHub provides 2,000 free minutes per month. Each deploy uses roughly 3 minutes, so you'd have ~650 free deploys per month before any charges.

💬 Comments 1
Leave a Comment